Choose your Orbit chain type
Before writing code, decide between an Arbitrum Rollup and an Arbitrum AnyTrust chain. This choice determines your security model, data availability costs, and user experience.
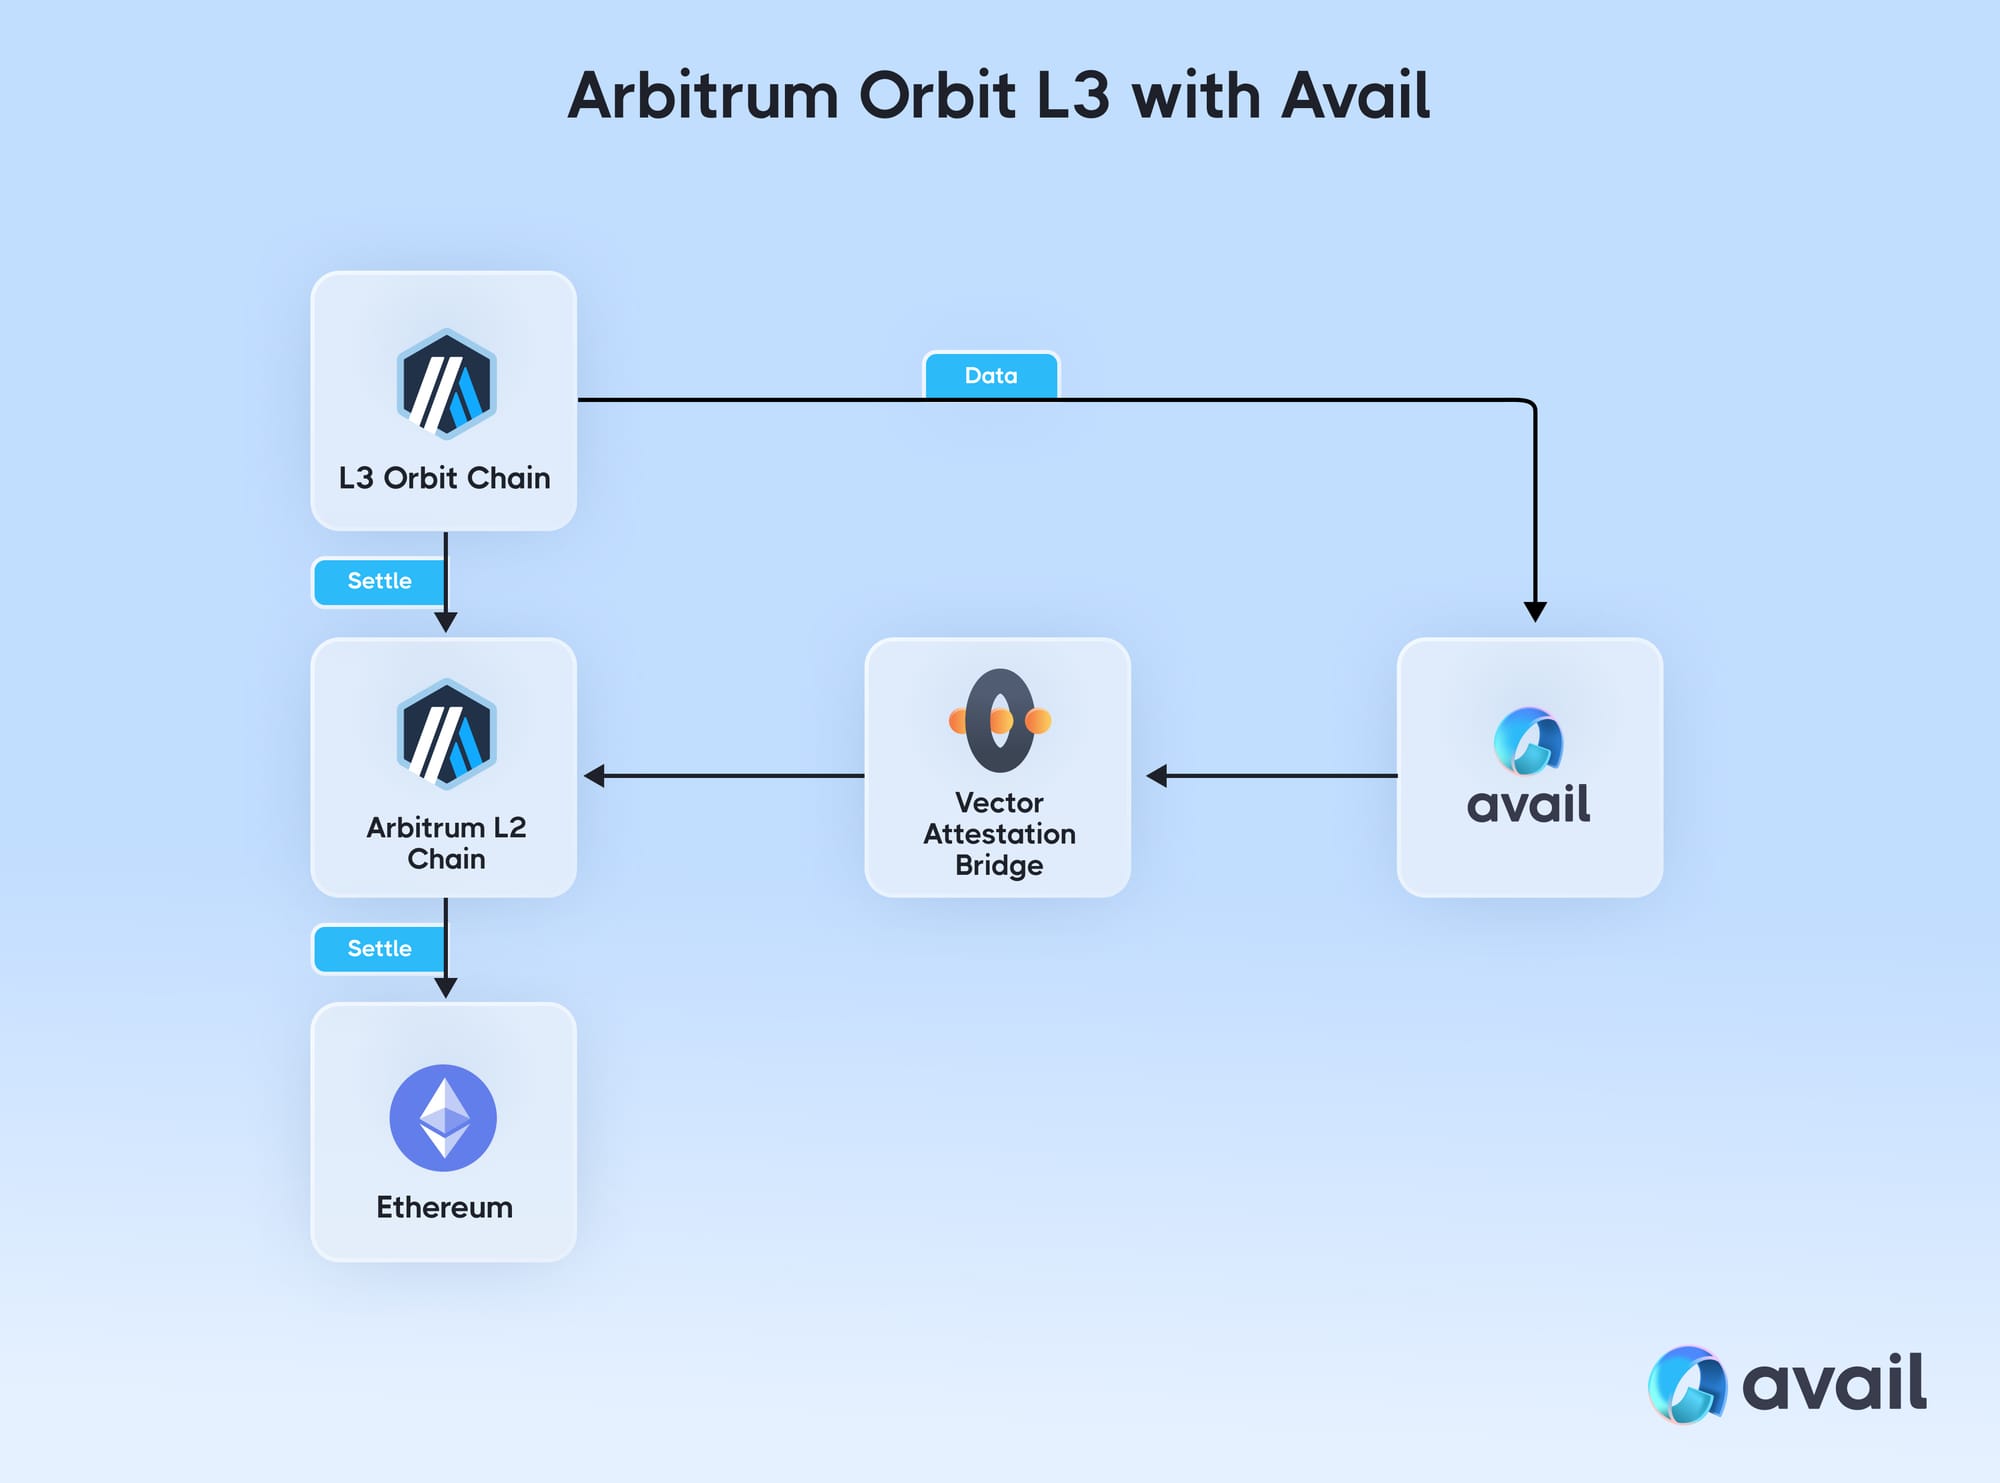
Arbitrum Rollups post transaction data to Ethereum and use fraud proofs. This provides the highest security, inheriting Ethereum’s consensus. However, posting full data blobs is expensive. This model suits high-value DeFi protocols or institutional infrastructure where security is paramount.
Arbitrum AnyTrust chains use a Data Availability Committee (DAC) to sign off on data availability instead of posting every byte on-chain. This allows for higher compression and lower costs. The trade-off is a slight reduction in decentralization guarantees, as security relies on the DAC’s honesty. This model is ideal for gaming, social apps, or projects where high throughput and low fees are critical.
| Feature | Arbitrum Rollup | Arbitrum AnyTrust |
|---|---|---|
| Data Availability | On-chain (Ethereum L1) | Off-chain (DAC) |
| Security Model | Fraud proofs | DAC signature |
| Transaction Cost | Higher (L1 data fees) | Lower (compressed data) |
| Throughput | Standard L2 limits | Higher (due to compression) |
| Best For | DeFi, high-value apps | Gaming, social, high-volume |
If unsure, start with a Rollup for maximum security. You can migrate to AnyTrust later if cost becomes a bottleneck, but migrating from AnyTrust to Rollup requires re-posting historical data, which is complex.
-
Define your primary use case (DeFi vs. Gaming)
-
Estimate monthly transaction volume
-
Calculate acceptable data availability risk
-
Review Arbitrum Orbit documentation
For details on Nitro technology and launch requirements, visit the official Arbitrum Orbit page.
Set up the development environment
To launch an Arbitrum Orbit chain, prepare your local machine with the Orbit SDK and the Nitro codebase. The SDK handles chain configuration, while Nitro provides the execution engine. Aligning these components before writing custom logic prevents configuration drift.
Install the Orbit SDK
The Orbit SDK is the primary interface for defining your chain’s parameters. It allows you to specify gas limits, block times, and precompiles without modifying core Nitro source code. Install it from the OffchainLabs GitHub repository:
npm install @offchainlabs/arbitrum-chain-sdk
This package includes types and utilities to generate the chainConfig.json file that Nitro reads at startup. Keep the SDK updated to ensure compatibility with the latest Nitro releases.
Clone the Nitro repository
Clone the Nitro codebase from the official Arbitrum GitHub repository. Nitro is the execution engine that processes transactions. While the SDK defines the "rules," Nitro is the "engine" that enforces them.
git clone https://github.com/OffchainLabs/nitro.git
cd nitro
Check out the specific commit or tag matching your desired Nitro version. Using a pinned version is critical for reproducibility, especially when deploying to testnets or mainnet. Mismatched versions between the SDK configuration and the Nitro binary can cause subtle consensus errors.
Configure the local Nitro node
Before building, configure the Nitro node to recognize your Orbit chain. This involves setting up the build environment and generating the initial node configuration. The Nitro build system relies on Go and requires specific environment variables to compile Orbit-specific binaries.
Set the ORBIT environment variable to enable Orbit chain compilation:
export ORBIT=true
make geth
This command compiles the arbitrum binary with Orbit support. Once compiled, initialize the node using the configuration file generated by the Orbit SDK. This step binds your custom chain parameters to the Nitro execution engine, creating a fully functional local node ready for development.
Run npm install @offchainlabs/arbitrum-chain-sdk to add configuration tools to your project. This package provides the types and utilities needed to define your chain’s parameters.
Clone the official Nitro codebase from GitHub and check out a specific commit. Pinned versions ensure reproducibility and prevent consensus errors between your SDK config and the node binary.

Set ORBIT=true and run make geth to compile the Arbitrum binary with Orbit support. This creates the executable that will process transactions on your custom chain.
Use the SDK-generated chainConfig.json to initialize the Nitro node. This binds your custom parameters to the engine, creating a functional local node for testing.
Configure chain parameters and genesis
Setting up your Arbitrum Orbit chain starts with defining the economic and technical rules that govern the network. These parameters are baked into the genesis block, meaning they are immutable once the chain is live on L1. You need to decide how the chain handles gas, sequencing, and data availability before you deploy.
Set the gas limit and fee parameters. The gas limit determines the maximum computational work per block, while the fee structure dictates how users pay for transactions. Configure the gas price oracle to adjust dynamically based on network congestion or set a fixed price for predictable costs. These settings directly impact user experience and chain throughput, so test them against your expected transaction volume.
The sequencer orders transactions before they are posted to Ethereum. Designate the sequencer’s address and configure its timeout settings. A shorter timeout ensures faster finality but may increase costs if the network is busy. Set up a fallback sequencer to maintain availability if the primary node goes offline, ensuring continuous operation for your users.
Bridges connect your new chain to Ethereum L1 and other Arbitrum chains. Configure the bridge addresses and set the dispute periods for any fraud proofs if you are using an optimistic rollup model. For AnyTrust chains, configure the data availability committee settings. These configurations control how assets move in and out of your chain, so ensure the addresses match your deployed contracts exactly.
Combine all the above settings into your genesis configuration file. This file defines the initial state of the chain, including the block number, timestamp, and any pre-deployed contracts. Review the JSON structure carefully, as errors here will prevent the chain from starting. Once validated, this genesis file is used to initialize your node and prepare for the L1 deployment.
Deploy the Arbitrum Orbit Chain to Ethereum
With your Orbit chain configured and the Nitro binary ready, the final step is registering the chain on Ethereum L1. This transaction establishes the rollup’s identity on the mainnet, allowing the chain to begin accepting and processing rollup data. The deployment relies on the deployer contract, which handles the initialization of the rollup proxy and the associated gateway contracts.
1. Prepare the Deployment Transaction
Before executing the transaction, ensure you have the correct deployer contract address and your private key configured in your deployment script. You will need to provide the rollupEventInbox address, the sequencerInbox address, and the rollupOwner address. These parameters define the core infrastructure of your new Orbit chain. Verify that your wallet has sufficient ETH to cover the gas costs for this mainnet interaction.
2. Execute the Deployment Script
Run your deployment script to submit the transaction to the Ethereum network. This action calls the createRollup function on the deployer contract. The contract will emit a RollupCreated event, which includes the address of your newly deployed rollup proxy. This event is critical, as it serves as the immutable proof of your chain’s existence on Ethereum. Monitor the transaction status using a block explorer like Etherscan.
3. Verify the Rollup Registration
Once the transaction is confirmed, verify that the rollup proxy address is correctly registered in the deployer contract’s mapping. Call the rollupToCreator or similar mapping function on the deployer contract with your wallet address. This step confirms that the chain is officially recognized by the Arbitrum ecosystem. Without this registration, the chain cannot interact with the broader Arbitrum network or utilize its security guarantees.
4. Configure the Sequencer
After deployment, configure your sequencer to point to the new rollup proxy address. Update your sequencer configuration file with the new rollupAddress and l1ChainId. Restart the sequencer service to establish a connection with the newly deployed rollup. The sequencer will begin submitting transaction batches to the L1 inbox contract, finalizing the Orbit chain’s integration into the Arbitrum ecosystem.
Common deployment mistakes to avoid
Even with the Arbitrum Nitro codebase handling the heavy lifting, misconfiguring your Orbit chain can lead to downtime or security vulnerabilities. The following errors are the most frequent pitfalls for developers launching a new Arbitrum Rollup or AnyTrust chain.
Misconfiguring the Sequencer
The sequencer is the heart of your chain’s throughput. If you do not properly configure the sequencer’s l2-output-submit-period or fail to set up the correct submit-pool settings, your chain may stall or fail to post state roots to Ethereum L1. Ensure your sequencer node has sufficient resources to handle peak transaction volumes without dropping blocks.
Ignoring L1 Gas Spikes
Your Orbit chain relies on Ethereum L1 for data availability and settlement. During periods of high Ethereum congestion, L1 gas fees can spike dramatically, making it prohibitively expensive to submit transaction batches or state roots. Configure your batch poster to monitor L1 gas prices and adjust submission frequency dynamically to avoid excessive costs or failed submissions.
Overlooking Security Audits
While the Nitro codebase is battle-tested, your custom configuration and any additional smart contracts deployed on your Orbit chain are not. Skipping a security audit of your chain’s configuration files or custom validators can expose your network to exploits. Treat your chain’s setup with the same rigor as a mainnet smart contract deployment.
Skipping Testnet Validation
Never deploy directly to mainnet without extensive testing on the Arbitrum Sepolia or Goerli testnets. Testnet validation allows you to verify that your sequencer, batch poster, and challenger nodes are communicating correctly. It also helps you identify configuration errors that could cause significant downtime or financial loss on mainnet.
Neglecting Monitoring and Alerting
A chain without monitoring is a blind spot. Implement robust monitoring for your sequencer, batch poster, and node health. Set up alerts for critical events such as missed state submissions, sequencer downtime, or unusual transaction patterns. Proactive monitoring allows you to respond to issues before they impact your users.
No comments yet. Be the first to share your thoughts!